Showing posts with label tutorial. Show all posts

Monday, December 13, 2010

Tutorial: Icon Terapung Tepi Blog

Sekiranya anda teringin nak pasang ikon/icon yang statik kat tepi blog anda macam yang ada kat blog ni. Sila jangan malu untuk baca tutorial yang saya tulis ni.

Sample:


Steps:

1. Log-in ke Dashboard Blogger.
2. Masuk ke bahagian Design > Edit HTML.

3. Gunakan function Search dalam Firefox atau Chrome (Ctrl+F) untuk cari tag <body> dan masukkan code yang disediakan betul-betul di bawah tag <body>  tersebut. Tips: Anda boleh juga meletakkan code di mana-mana saja asalkan di dalam bahagian body template anda (<body> .......... </body>) tetapi icons akan load paling last kalau letak kat belakang dekat dengan </body>.

Copy and Paste code dalam <body>:   (DELETE WARNA OREN)

<style type="text/css">
#fixed_icons {
background: transparent;
width: 48px;     //tukar mengikut saiz icon anda
position: fixed;
top: 15%;     //tukar kedudukan vertical icon (bole guna % or px)
right: 0.20%;     //tukar kedudukan horizontal (bole guna % or px)
z-index: 3;     //supaya icon tidak tersembunyi di belakang image lain
}
#fixed_icons a {
display: block;
text-indent: 24px;
height: 48px;     //tukar ikut saiz icon anda
padding-bottom: 3px;     //untuk tentukan jarak vertical antara setiap icon
text-decoration: none;
opacity: 0.6;     //transparency settings (0=invisible, 1=no transparency)
-moz-opacity: 0.6;     //transparency setting Firefox tua
-khtml-opacity: 0.6;     //transparency setting Safari kuno
filter: alpha(opacity=60);    //transparency setting Internet Explorer lapok
}
#fixed_icons a:hover {
opacity: 1.0;     //setting transparency untuk mouse over
-moz-opacity: 1.0;
-khtml-opacity: 1.0;
filter: alpha(opacity=100);
}
#fixed_icons #facebook {
background: url(http://URL icon Facebook) no-repeat;
}
#fixed_icons #twitter {
background: url(http://URL icon Twitter) no-repeat;
}
#fixed_icons #rss {
background: url(http://URL icon RSS) no-repeat;
}
#fixed_icons #email {
background: url(http://URL icon email) no-repeat;
}
</style>

<div id="fixed_icons">
<a href="http://www.facebook.com/ridhuan" title="Duan on Facebook" target="_blank" id="facebook"></a>
<a href="http://twitter.com/eworque" title="Follow me on Twitter" target="_blank" id="twitter"></a>
<a href="http://feeds.feedburner.com/DuanSays" title="RSS Feed" target="_blank" id="rss"></a>
<a href="http://feedburner.google.com/fb/a/mailverify?uri=DuanSays&loc=en_US" title="RSS updates via e-mail" target="_blank" id="email"></a>
</div>

*Code warna merah dan purple adalah nama/id untuk setiap item. Kalau nak tukar letak nama sendiri pun boleh tetapi mesti tukar semua sekali dengan nama yang sama. 
*Tukar tulisan warna pink kepada link anda dan tulisan hijau kepada ayat anda ikut suka hati. Kalau anda tak guna Feedburner anda boleh tukar kepada Formspring, MySpace atau apa-apa saja. Pandai-pandai sendiri la.

*Shortcut!!
  • Masuk kat Dashboard > Design > Page Elements.
  • Add A Gadget > HTML/Javascript
  • Copy and Paste the same codes
 *Kalau anda tak suka icon tukar transparency tetapi nak tukar kepada icon lain atau nak icon berubah kedudukan sewaktu mouseover, anda boleh cuba memandai dengan setting hover dalam code di atas. Code di atas juga telah diubah suai menggunakan teknik "Memandai Sendiri".

*Untuk pengguna Self-hosted WordPress. Gunakan code yang sama tetapi tampalkan code:
<div id="fixed_icons"> ... to ... </div>
di dalam <body> tag di dalam header.php ataupun sebelum tag </body> di dalam footer.php.

Kemudian tampalkan hanya code yang berada di antara:
<style type="text/css"> ... to ... </style>: ke dalam file style.css.

Delete <style type="text/css"> dan </style> sebab dalam style.css tak diperlukan tag tersebut.

Read more...

Tuesday, June 16, 2009

Cara Meletakkan Kotak HTML Textarea

Kotak textarea ialah kotak untuk meletakkan text atau kod HTML bagi memudahkan pengguna blog menyalin untuk digunakan di blog mereka. Dengan penggunaan textarea box, kesalahan HTML yang biasa berlaku dapat dielakkan. Pada kebiasaannya, apabila kod HTML ditulis secara terus di dalam sesebuah kandungan web, kod tersebut akan terus ditukarkan kepada fungsi yang ingin diperolehi tanpa memaparkan kod tersebut.

Kotak textarea:


Kod:

<textarea name="textarea" id="textarea" cols="45" rows="2">texts or HTML codes here</textarea>

Contoh penggunaan textarea bagi memaparkan kod untuk banner blog:

mybanner


<textarea name="textarea2" id="textarea2" cols="45" rows="2"><a href="http://ridhuan.co.cc/blog/"><img src="http://ridhuan.co.cc/blog/wp-content/uploads/2009/06/mybanner.gif" alt="mybanner" width="120" height="22" border="0" /></a></textarea>

Read more...

Saturday, January 31, 2009

Nak Scrolling Tag Cloud Dalam Blog?

Ada orang tanya "Camne nak wat label cloud tu?". Ok kalo anda pandai bahasa amerika dan pandai edit sendiri template blog anda, go to this address and read it for yourself. Bagi yang bole baca tapi tak reti nak buat atau yang tak paham apa depa tulis kat situ. Baca betul-betul apa yang aku tulis kat sini. Untuk sapa-sapa yang nak je la. Yang tak mau tag cloud tu buang masa je baca benda ni. (Yang aku tulis kat sini hanya untuk Blogger by Google. Kalo Wordpress try la cari sendiri kat website tu jugak.)

1. Layout > Edit HTML (kalau tak paham tengok gambar tu)


2. Bila dah masuk window untuk edit template HTML, cari (Control+F kalo pakai Firefox) benda kat bawah ni:

<b:section class='sidebar' id='sidebar' preferred='yes'>

*bagi yang pakai template dengan 1 sidebar, mungkin bole terus jumpa benda tu, bagi yang pakai template dengan 2 atau 3 sidebar, anda mungkin kena modify "id='sidebar1' atau id='sidebar2' atau id='sidebar3'"

3. Bila dah jumpa, paste a.k.a tampal ayat ni kat bawah line tadi:

<b:widget id='Label99' locked='false' title='Labels' type='Label'>
<b:includable id='main'>
<b:if cond='data:title'>
<h2><data:title/></h2>
</b:if>
<div class='widget-content'>
<script src='http://halotemplates.s3.amazonaws.com/wp-cumulus-example/swfobject.js' type='text/javascript'/>
<div id='flashcontent'>Blogumulus by <a href='http://www.roytanck.com/' target='_blank' rel='nofollow'>Roy Tanck</a> and <a href='http://www.bloggerbuster.com' target='_blank' rel='nofollow'>Amanda Fazani</a></div>
<script type='text/javascript'>
var so = new SWFObject(&quot;http://halotemplates.s3.amazonaws.com/wp-cumulus-example/tagcloud.swf&quot;, &quot;tagcloud&quot;, &quot;240&quot;, &quot;300&quot;, &quot;7&quot;, &quot;#ffffff&quot;);
// uncomment next line to enable transparency
//so.addParam(&quot;wmode&quot;, &quot;transparent&quot;);
so.addVariable(&quot;tcolor&quot;, &quot;0x
333333&quot;);
so.addVariable(&quot;mode&quot;, &quot;tags&quot;);
so.addVariable(&quot;distr&quot;, &quot;true&quot;);
so.addVariable(&quot;tspeed&quot;, &quot;100&quot;);
so.addVariable(&quot;tagcloud&quot;, &quot;<tags><b:loop values='data:labels' var='label'><a expr:href='data:label.url' style='12'><data:label.name/></a></b:loop></tags>&quot;);
so.addParam(&quot;allowScriptAccess&quot;, &quot;always&quot;);
so.write(&quot;flashcontent&quot;);
</script>
<b:include name='quickedit'/>
</div>
</b:includable>
</b:widget>


*Kalau nak tukar nama widget tu, rename atau edit yang kaler biru.
*Kalau nak edit lebar or width, edit yang kaler oren tu.
*Kalau nak edit tinggi or height, edit yang kaler ungu.
*Kalau nak edit kaler background, edit yang kaler merah tu. (mesti dalam Hexadecimal value)
*Kalau nak buat background transparent, delete // yang kaler hijau tu.
*Kalau nak tukar font kaler (warna tulisan), edit yang kaler merah gelap. (Hexadecimal)


4. Lepas tu masuk Layout > Element, cari widget baru tadi (tengok nama apa yang anda bagi). Time ni anda bole la drag and drop widget tu kat mana-mana tempat yang anda suka. Kalau nak tukar nama pun bole.

Okay settle. Harap-harap menjadi la. Selamat mencuba

Read more...

Thursday, January 29, 2009

Basic HTML Knowledge

I write this just to give everybody some basic knowledge of HTML so that you can simply modify or edit your widget, layout, text, or banner in your blog to any style you want to. This is not a tutorial but just an information. What you have to do to understand this is to copy every text written in blue > paste in notepad > Save As "anything.html" (set the file type as All Files) > Then open the saved file in Firefox or Internet Explorer > Then compare what you see in the saved file with the text written in this article. If you thoroughly analyze them, you can simply understand the basic of setting font color, size, making links, banner, or any other attribute. In the code, there is also some string for you to make custom table so that you can insert it in your sidebar widget as I did in this blog.

Copy this:

<html>

<head>

<title>Basic HTML Page</title>

</head>

<body>

1st line without paragraph - testing colour <font color="red">red,</font><font color="green"> green,</font><font color="blue"> blue,</font><font color="navy"> navy,</font><font color="pink"> pink,</font><font color="yellow"> yellow</font><font color="#33FF66"> or any Hexadecimal colour codes</font>

</br>

2nd line without paragraph - testing font face <font face="Times">Times New Roman,</font><font face="Arial"> Arial,</font><font face="Verdana"> Verdana,</font><font face="Courier"> Courier.</font>

<p>3rd line with paragraph - testing font <font size="5">size,</font> <i>italic,</i> <u>underline,</u> <s>strike-through,</s> and <b>bold</b></p>

<p align="center">4th line with paragraph - testing <font color="red" size="-2" face="Verdana">font <i>attributes</i> combination</font></p>

<center>5th line without paragraph - testing <a href="http://duansays.blogspot.com/">hyperlink</a> , <a href="http://duansartworks.blogspot.com" target="_blank">pop-up hyperlink</a> and <a href="http://www.google.com/" target="_blank" rel="nofollow">no-follow link</a></center>

<table border="1" align="center">

<tr>

<td width="125"><div align="center"><a href="http://duansartworks.blogspot.com/" target="_blank"><font color="#990000" size="-1" face="Verdana">1st row 1st column</font></a></div></td>

<td width="125"><div align="center"><a href="http://duansays.blogspot.com/"><img border="0" alt="Duan Says..." width="120" style="height:24px; width:120px;" src="http://www.geocities.com/eworque/banner-duansays.gif" height="24" title="Duan Says..."/></a></div></td>

</tr>

<tr>

<td><div align="right"><font face="Arial" size="-1">2nd row 1st column</font></div></td>

<td><div align="center"><font size="-2">2nd row 2nd column</font></div></td>

</tr>

</table>

<p>inserting image from any url: </p>

<p><img src="http://www.geocities.com/eworque/banner-duansays.gif" width="120" height="24" alt="duan" /></p>

</body>

</html>

Read more...

Tuesday, January 27, 2009

How to Insert MySpace Music Player to Your Blog


Before this, I put desafm radio in this blog since it was requested by the radio owner. I actually don't like radio or any autoplay music in my blog or any blog that I visit. I've been using the MySpace Music Player in my MySpace profile for a few month and I think this is the best player to be placed in any web pages or blog since it does not play automatically and it has option to add up to 10 songs in the playlist. The audio quality is also very good. The only problem is there is no option in MySpace for you to embed the player to your site or blog. Fortunately, with a little knowledge of html, I manage to steal the player from the MySpace profile and embed it in this blog.

WARNING: This might violate MySpace Terms & Conditions and might cause your MySpace profile to be deleted.

This is how to do it:
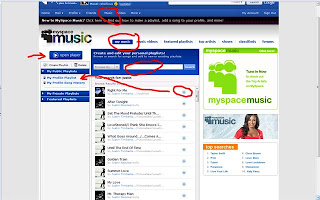
  1. If you still don't have the player in your MySpace profile, go to MySpace Music, click on the My Music tab, search for your favorite songs, and add up to 10 songs to your My Public Playlist > My Profile Playlist. (Everytime you add a song, it will automatically added to the Public Playlist)
  2. Check the added songs by clicking on the My Profile Playlist link. You can manage the song position in the playlist here.
  3. After you done editing the playlist, test it by clicking on the Open Player button.
  4. Now view your MySpace profile (myspace.com/yourprofile). It might took a while for the player to appear in your profile.
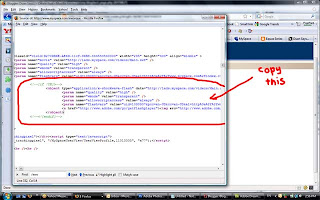
  5. If you already have the player in your profile, view the source code of the profile page. (right-click > view source).
  6. Search for this strings: <!--[if !IE]>--> <object type="application/x-shockwave-flash" data="http://lads.myspace.com/videos/Main.swf" width=
  7. Copy everything starting from <object type= to </object>
  8. Go to your blogger dashboard, add a new HTML widget to your blog, and paste the code in the widget. You can try to change the width and height to match you blog sidebar.
  9. Now you're done and can enjoy the music on your own blog. If you want to change the songs, just go to your MySpace Music.
*This method have not been tested in Wordpress yet.

Read more...

Monday, January 26, 2009

Slow-Mo Effect in Windows Vista


For Windows Vista users with Aero Theme, you'll notice a fade-in/fade-out animation when you minimize/maximize a window or when you open/close a window. Since the animation happened so fast and most of the time we just ignore it, there is a trick to slow down that animation whenever you want to. With a little tweak, you can slow down the animation just by holding down the Shift key. To enable the slow-mo effect, you'll have to do a little modification to the Registry.


Here's how to do it:
  1. Open the Run dialog box (Windows-key + R), type regedit (or regedit.exe), and then click OK (or press Enter) to open the Registry Editor. User Account Control might prompt you to allow the action, click Continue.
  2. Find the folder HKEY_CURRENT_USER\Software\Microsoft\Windows\DWM.
  3. Create a new DWORD (32-bit) value. (right-click > New > DWORD (32-bit) Value)
  4. Rename the DWORD value as AnimationShiftKey.
  5. Double-click the DWORD and give it a value of 1.
  6. Click OK and close the Registry Editor.
  7. Log off Windows and log back on again.
  8. Try the function by holding Shift key when you minimize/maximize a window or opening/closing a window.
*Note that this function does not work with every application or with other operating system.

Read more...

Thursday, January 1, 2009

How to Make Banner for Your Blogs

Making banner is quite simple but you have to know how to edit images by using MS Paint, Photoshop, Illustrator, etc. You can simply use ImageReady, Fireworks, or Flash to make animated gif images. Since Paint is the only software that almost everybody have, I'm going to make a animated banner using Paint and Gickr.com.

Start the Paint software, change the attributes (Ctrl+E or select Image > Attributes). Change the height and width to your desired size. Draw something and then Save As the file as "banner1" or any name. Then just undo some actions to clear the page or add other drawing. Then save the file as "banner2". You should now has two files with same dimension.
Now go to Gickr.com and just upload the two files in the given form. Select the size of the image or enter your own, select the speed, and click "continue". Your animated banner will be generated and then save the file in your computer and rename it.
Then upload the file to your blog, photobucket, myspace. friendster, etc. and copy the address.
To have the banner in your sidebar, or anywhere in your blog, use the following html code and paste it in your html widget.

<a href="http://your.blog.address/"><img src="http://the.address.you've.uploaded.the.banner/banner.gif" border="0" /></a>

To add textbox in you blog post or sidebar for your visitors to copy the code, use the following html code:

<textarea name="textarea" cols="30" rows="2" ><a href="http://your.blog.address/"><img src="http://the.address.you've.uploaded.the.banner/banner.gif" border="0" /></a></textarea>

Change the column and rows size (cols and rows) to your desired values. All those in blue are editable. You can further customize the codes using html editor such as Dreamweaver if you want to.

Read more...
Related Posts with Thumbnails

Nang it

  © Duan Says... The Professional Template by Ourblogtemplates.com 2008

Back to TOP